Upgrading Data2Evidence
Every upgrade follows the standard upgrade steps. Some releases need additional steps, which are listed per version below. Read the section for the version you are upgrading to before you start.
Note: Upgrades are tested between consecutive versions only. Skipping versions has not been tested and is not recommended. To upgrade across several versions, repeat the steps for each version in turn.
Standard upgrade steps
Run all commands in the d2e directory that holds the CLI binary and the .env file.
1. Download the new CLI
Download the CLI binary for the new version and replace the existing d2e binary. Use the commands in Download the CLI binary, with VERSION set to the new version, for example VERSION="0.19.0-beta".
The CLI includes the Docker Compose files for its version and updates them in the d2e directory when it runs. Do not edit docker-compose.yml by hand: your changes would be overwritten.
2. Set the image tag in .env
The Docker image tag is set in the .env file, not in docker-compose.yml. Open .env and set DOCKER_TAG_NAME to the new version:
DOCKER_TAG_NAME=0.19.0-beta
The format is <version>-beta. If DOCKER_TAG_NAME is not updated, Data2Evidence keeps starting the images of the previous version.
If your .env file also sets PLUGINS_IMAGE_TAG or PLUGINS_API_VERSION, update them to the new version as well, or remove them so the CLI uses the matching default.
If you are upgrading from a version earlier than v0.18, also add PLUGINS_SEED_UPDATE=true to .env. Data2Evidence then upgrades the plugins on the next start. Upgrades from v0.18 or later do not need this.
3. Apply the version-specific steps
Check the section for the version you are upgrading to below, and apply any steps that must happen before the start.
4. Verify the version
./d2e version
d2e CLI version and Docker image tag must both show the new version.
5. Pull the new images and start Data2Evidence
./d2e pull
./d2e start
Use the same options as for your usual start. For example, add -e to both commands if you run the demo database: ./d2e -e pull and ./d2e -e start.
6. Check the result
- Sign in and check that the Researcher Portal and the Admin Portal load.
- Apply any steps the version-specific section lists for after the start.
v0.18 to v0.19
From v0.19, trex replaces Logto as the identity provider. Read Identity provider before upgrading.
Back up the database
The upgrade runs database migrations that cannot be undone. For example, duplicate user records are merged. Take a database backup first. Rolling back is only possible by restoring that backup.
Check the Logto database credentials
Make sure PG__LOGTO_MANAGER_USER (default logto_postgres) and PG__LOGTO_MANAGER_PASSWORD are set in your .env file. The user migration needs them to read the Logto users.
Start Data2Evidence with the new CLI
Download the v0.19 CLI and start Data2Evidence as described in the standard upgrade steps. On the first start, the CLI:
- Sets
D2E_IDP_MODE=logto-federated, so users keep signing in through Logto. - Adds the new settings
D2E_IDP,TREX__OIDC__WEBAPI_CLIENT_IDandTREX__OIDC__WEBAPI_CLIENT_SECRET, plusTREX_ROOT_KEYif it is missing. - Sets
USER_MGMT__ROLE_SOURCE=trex. - Writes
TREX__SERVICE_ROLE_KEYonce trex has started, and restarts the affected services.
trex then migrates the Logto users and their roles automatically.
If you start Data2Evidence without the d2e CLI, for example with Docker Compose directly, add these settings to the env file yourself. Also add docker-compose-logto-federation.yml as an additional compose file.
Check the user migration
./d2e migrate-idp-roles --report
See Checking the migration for what each skip reason means.
After the upgrade
- Manage roles and create new users in Data2Evidence user management, not in Logto.
- Suspend and un-suspend users in Logto.
Removed services
The following services were removed: Jupyter (Enterprise Gateway), MLflow, the DICOM server, Redis and the logs viewer. The AI Models and Logs pages are no longer in the Admin Portal. The REDIS_PASSWORD, REDIS_HOST, REDIS_PORT, DICOM__HEALTH_CHECK_PASSWORD and SQL_RETURN_ON variables can be deleted from your .env file.
Integrations that call trex directly
The trex OIDC endpoints moved. Update external integrations that hard-code the old paths. See Integrations that call trex directly.
v0.17 to v0.18
Generate new environment variable TREX_ROOT_KEY
TREX_ROOT_KEY must be a random 32-byte value, base64-encoded (ie >=40 characters). Generate your own
with the following command below, then add it in your .env file.
Using Node.js:
node -e "console.log(require('crypto').randomBytes(32).toString('base64'))"
v0.16 to v0.17
Update Cache
For each existing dataset that has both a source and a cache dataset, an admin must re-run Update cache from the dataset's "Select action" menu. Without this, concept search will not work on those datasets.
v0.15 to v0.16
Sync Roles
On first startup after upgrading, syncroles runs automatically and prompts for admin credentials. This step is required only on the first startup after upgrading.
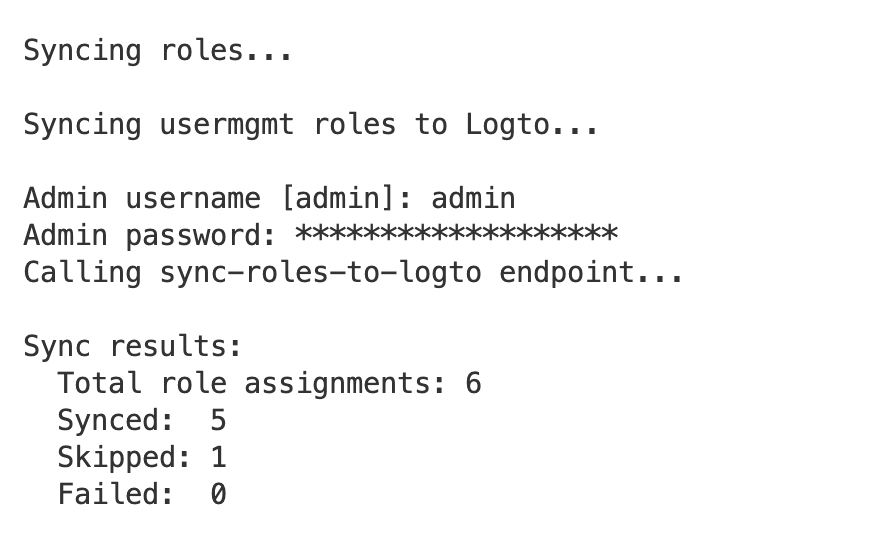
Upon successful completion, the following output is displayed:
All roles synced successfully. Set USER_MGMT__ROLE_SOURCE=logto in .env.local